Showing posts with label Entrees. Show all posts
Showing posts with label Entrees. Show all posts
Wednesday, April 16, 2014
Pan Fried Fish with Roasted Veggies
Well I'm back. I saw where Jamie posted about Dancing with the Stars and I could not take it. Before we talk food, let me just say my prediction on Bubba Watson winning the Masters was pretty solid. Second, Jamie's prediction on me coming home a little late from the golf course was solid as well (at least she says so). Alright, enough about the weekend on to the cooking.
We went to Publix on Saturday evening and decided on some Dover sole fish that was on sale. We bought approx. 3/4 a lb of the fish and on Sunday night it was on. I decided to go against the healthy way of cooking fish and did a little pan fry of the fish. Jamie was in charge of the side. We'll start with the fish.
Ingredients:
3/4 lb of Dover sole
1 cup of flour
1 cup of cornmeal
1 egg, beaten
2 tablespoons of EVOO
2 tablespoons of diced onion
1 tablespoon of capers
3 tablespoons of white wine
salt and pepper to taste
Using a nonstick frying pan, pour a nice coat of EVOO. Heat the oil over medium heat and make sure it gets nice and hot before adding the fish to the pan. While heating the pan, go ahead and get your ingredients together. Crack the egg in a bowl, and pour the flour and cornmeal onto a plate and mix together. Add a little salt and pepper to the flour and cornmeal mixture. Once the oil is hot, go ahead and dip the fish in the egg. Then place the fish in the flour/cornmeal mixture and make sure both sides of the fish are coated with the mixture. Then place the fish in the pan. I placed 4 small pieces in the pan I was using, but use discretion and do not overcrowd the pan as you want an even browning of the crust. It should take about 5 min to get the nice golden crust on the fish. Flip the fish and brown the other side. Once both sides are crisp and golden brown, set the fish on a plate with a paper towel to get rid of the excess oil. You can also add a little more salt and pepper at this time, if desired.
Next, add the diced onion in the pan. Let the onion cook for about a minute (until they soften and become translucent) and then add the capers. Let that cook for another minute and then pour a little white wine into the pan. Let the wine cook down (about 30 seconds) and then pour the mixture over the fish.
This is the finished product.
.jpeg)
For the Side:
2 Red Bell Peppers, sliced
3 Green Bell Peppers, sliced
1 onion, sliced
3 tablespoons of EVOO
1/4 tsp garlic salt
1/4 tsp pepper
1/4 tsp pepper
Preheat oven to 400 degrees.
Chop the peppers and onions into nice bite size pieces. Pour the veggies onto a baking pan and pour the EVOO over the veggies. Sprinkle the veggies with garlic salt and pepper. Then using your hands, toss the veggies to make sure all of they are coated. Then spread the veggies out on the baking pan so they aren't overlapping. Bake for 20-25 min.


Friday, April 11, 2014
Pimento Cheese and Masters Takeover
Recipe from Luke...
Well I (Luke) am taking over the blog for the day so this post will be a lot more fun to read than Jamie's posts. As most of y'all don't know (since I never post), I love sports and this is probably my favorite non-football week of the year. On Monday we had the NCAA basketball season come to a close and this weekend we have the greatest golf tournament in the world, The Masters.
If you have never been to Augusta National to watch golf, then you are really missing out on a wonderful treat. Even if you don't like golf, the beauty of the course and the atmosphere is unlike any other. Also if you want to eat and drink while you're there, you can eat breakfast, lunch and dinner for less than $20 for the entire day. So since this is a food blog, I will have to tell you my favorite thing to eat there is the Pimento Cheese Sandwich which I think runs you about $1.50. Pimento Cheese is quick and easy and makes a very underrated sandwich. So here is my quick and easy version of 5 cheese pimento cheese.
.JPG)
1 cup of Sharp Cheddar, shredded
1 cup of Jack Cheese, shredded
1 cup of Colby Jack Cheese, shredded
1 cup of Medium Cheddar, shredded
4 oz. of Cream cheese, softened
1/2 cup of mayo
3 Tablespoons of diced pimentos
1 teaspoon of black pepper
1/2 teaspoon of paprika
Combine all of the cheeses, including the cream cheese, in a large bowl. In a small bowl, stir the mayo, pimentos, pepper and paprika together. Then pour the mayo mixture into the bowl with all of the cheese and stir all of the ingredients together and that's it.
.JPG)
To make a sandwich, the key is to get a old fashion white bread. This also makes for a wonderful grilled cheese.
Before I let you go, I am going make my pick for this years Masters Champion, Bubba Watson (Go Dawgs!)
Wednesday, April 9, 2014
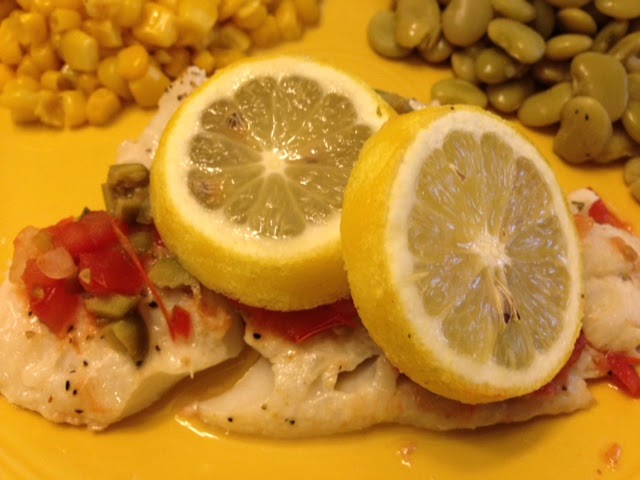
Mexican Style Cod


Wednesday, April 2, 2014
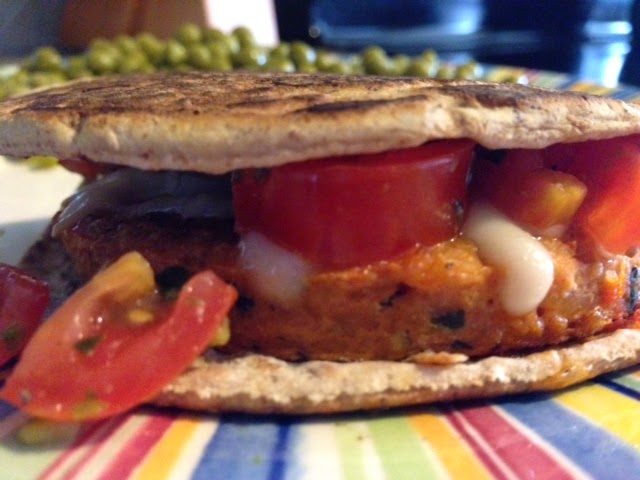
Bruschetta "Burger"
I enjoy trying new recipes. I rarely cook the same thing more than once because there are too many recipes to try. Who wants to waste their time cooking the same recipe over and over? Not me! Fortunately Luke is always up for trying a new recipe so he has never complained. Since I don't eat or cook most meats, he's in charge of cooking his own meaty meals and he also rarely cooks things the same way.
I love MorningStar Farms products but I also love BOCA's Bruschetta Burger. I've made it several different ways, and I've enjoyed them every way I've made them. I've made them with marinara sauce and cheese, I've made them with my favorite sundried tomatoes with herbs, but recently I tried with them with fresh grape tomatoes and basil paste and that's my favorite so far.

Per Serving:
1 BOCA Bruschetta "Burger"
1 slice of mozzarella cheese
3 grape tomatoes, chopped
1/2 tsp. basil paste or 1 tsp. fresh basil, chopped
1/8 tsp. pepper
1/8 tsp. salt
1/8 tsp. garlic powder
2 tbsp. sundried tomato spread
1 piece of flat bread
Cook the Bruschetta Burger according to the package instructions.
In a small bowl, stir the chopped tomatoes, basil, salt, pepper and garlic powder together.
Spread the sundried tomato spread across one side of the flat bread. Place the cooked "burger" on the flat bread. Then put the cheese on top of the "burger" and pour the tomato mixture on top of the cheese. Fold the flat bread over the "burger". I like the flat bread crispy and I also like to melt the cheese so I heat a skillet over medium heat and spray it with cooking spray. Then I place the flat bread "burger" in the skillet and brown both sides.
I love MorningStar Farms products but I also love BOCA's Bruschetta Burger. I've made it several different ways, and I've enjoyed them every way I've made them. I've made them with marinara sauce and cheese, I've made them with my favorite sundried tomatoes with herbs, but recently I tried with them with fresh grape tomatoes and basil paste and that's my favorite so far.
Per Serving:
1 BOCA Bruschetta "Burger"
1 slice of mozzarella cheese
3 grape tomatoes, chopped
1/2 tsp. basil paste or 1 tsp. fresh basil, chopped
1/8 tsp. pepper
1/8 tsp. salt
1/8 tsp. garlic powder
2 tbsp. sundried tomato spread
1 piece of flat bread
Cook the Bruschetta Burger according to the package instructions.
In a small bowl, stir the chopped tomatoes, basil, salt, pepper and garlic powder together.
Spread the sundried tomato spread across one side of the flat bread. Place the cooked "burger" on the flat bread. Then put the cheese on top of the "burger" and pour the tomato mixture on top of the cheese. Fold the flat bread over the "burger". I like the flat bread crispy and I also like to melt the cheese so I heat a skillet over medium heat and spray it with cooking spray. Then I place the flat bread "burger" in the skillet and brown both sides.
It's delish!!! :)
Tuesday, April 1, 2014
Pan-Seared Scallops and Snapper Fillets
Luke cooked a delicious dinner the other night! We had pan-seared scallops and snapper fillets. Izzy and I were upstairs in the bonus room watching a movie so I didn't even realize he'd started cooking. I thought I heard him in the kitchen so I went downstairs and he was cooking away. I asked if there was anything I could do but all he asked me to do was put the seasoning on the snapper because he already had everything else covered. So I seasoned the snapper and poured myself a glass of wine and let him work his magic. ;)

2 servings:
1 tbsp. extra virgin olive oil
2 snapper fillets
2 tbsp. Weber Roasted Garlic & Herb Seasoning
In a medium skillet, heat the olive oil over medium heat. Sprinkle the top of each snapper fillet (we did not season the skin side) with a tablespoon of the Weber seasoning. Place the fillet skin side down in the skillet and cook for about 8 minutes. Then gently flip the fillets and cook for an additional 3 - 4 minutes.
2 servings:
1 tbsp. extra virgin olive oil
1/2 pound patagonian scallops
1 1/2 tsp. Everglades Heat
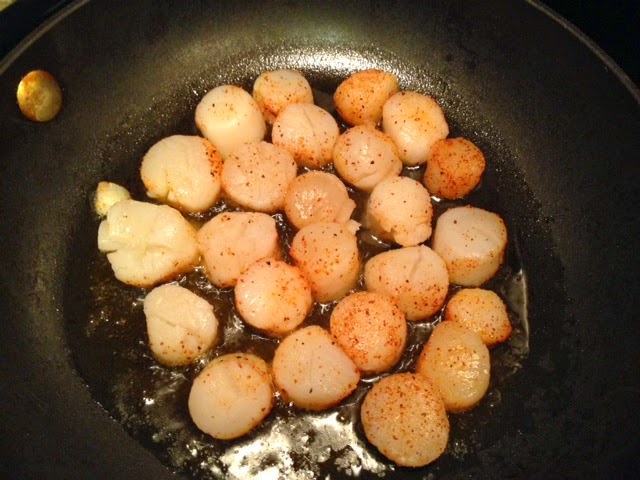
In a medium skillet, heat the olive oil over medium heat. Sprinkle the patagonian scallops with the Everglades Heat. Make sure they're all coated with the seasoning. If you like your food spicy, you can add more Everglades Heat. Place the scallops in the skillet and flip once they're golden brown. Once the other side is golden brown, remove from heat and you're ready to eat. :)

2 servings:
1 tbsp. extra virgin olive oil
2 snapper fillets
2 tbsp. Weber Roasted Garlic & Herb Seasoning
In a medium skillet, heat the olive oil over medium heat. Sprinkle the top of each snapper fillet (we did not season the skin side) with a tablespoon of the Weber seasoning. Place the fillet skin side down in the skillet and cook for about 8 minutes. Then gently flip the fillets and cook for an additional 3 - 4 minutes.
2 servings:
1 tbsp. extra virgin olive oil
1/2 pound patagonian scallops
1 1/2 tsp. Everglades Heat
In a medium skillet, heat the olive oil over medium heat. Sprinkle the patagonian scallops with the Everglades Heat. Make sure they're all coated with the seasoning. If you like your food spicy, you can add more Everglades Heat. Place the scallops in the skillet and flip once they're golden brown. Once the other side is golden brown, remove from heat and you're ready to eat. :)
Monday, March 24, 2014
Meatless Monday
Why do the weekends always fly by? It's so not fair. Luke and I had such a nice weekend. He played golf Saturday and Sunday and I just enjoyed doing what I wanted, even if that meant doing nothing. If you know me, you know I can't sit still for too long so my doing nothing only lasts about 30 minutes.
Saturday night was our date night. We had dinner in downtown Columbia, SC at a restaurant called Basil. It's a Thai restaurant and it's super yummy!! The first time we went to Basil was a few years ago in downtown Charleston, SC with my brother and his wife and we loved it. So Luke and I were both really excited when a Basil restaurant opened in Columba last year.
I have a new favorite drink. It's a Pineapple Mojito. I don't usually like Mojitos, but the pineapple was calling my name so when I saw that on the menu, I thought I had to try it. Oh my gosh, it's so good! I told Luke he has to try to remake this drink at home! ;)
Yesterday I spent most of my afternoon in the kitchen. Luke and I had separate meals for dinner but we cooked and ate dinner together so it worked out. :) For dinner, I had Giada's lentil burger.
Giada De Laurentiis is one of my favorite Food Network chefs. I love her show and her recipes! Over the years, I've tried so many of her recipes and they've all turned out delicious. I recently bought her new cookbook, "Giada's Feel Good Food" which offers a wide variety of recipes. I've already tried several of the recipes in this cookbook and none of them have disappointed.
The Lentil Burger with Lemon-Basil mayonnaise which I had for dinner is from her cookbook. Oh my goodness, yum! However, it is time consuming so don't expect to whip this recipe together within a few minutes and eat. Once you combine everything, you have to put the "burgers" into the refrigerator for at least 30 minutes to set, but they're delicious so they're worth the wait. :)
Lentil Burger:
1/2 extra-virgin olive oil
2 large shallots or small onion, minced
1 1/2 tsp kosher salt
1/2 tsp pepper
2 garlic cloves, minced
6 mushrooms, chopped
2 tbsp. fresh thyme leaves, chopped (or 1 tbsp. dried thyme)
1/2 cup green peas
2 cans lentils, rinsed and drained (or 1/2 bag of dried lentils, rinsed, then cook for 20 minutes)
1/2 cup, plus 1/3 cup cornmeal
2 tbsp. mayonnaise
1tbsp fresh lemon juice
In a medium skillet, heat 1/4 cup of olive oil and add the shallots along with 3/4 teaspoon of salt and 1/4 teaspoon of pepper. Cook until shallots are softened. Then add the garlic, mushrooms, thyme and 3/4 teaspoon of salt and 1/4 teaspoon of pepper. Cook until mushrooms are soft and set aside.
Using a food processor, puree the peas and half of the lentils until smooth. Then spoon into a bowl and add the remaining lentils, 1/3 cup of cornmeal, mayonnaise, lemon juice and mushroom mixture. Mix together with a spoon and then form into 6 patties.
Sprinkle 1/4 cup of the cornmeal onto a cookie sheet and place the patties on top of the cornmeal. Then sprinkle the remaining 1/4 cup of cornmeal on top of the patties and refrigerate for at least 30 minutes.
Heat olive oil in a large skillet over medium high heat. Cook the patties in the skillet until golden brown on each side.
Mayonnaise topping:
1 cup mayonnaise
1/2 cup fresh basil, chopped (or 1/4 cup of the basil in a tube)
Zest of 1 lemon
In a small bowl, stir the mayonnaise, basil and lemon zest until combined.
Place the patties on top of butter lettuce. Then top each pattie with sliced tomatoes and a dollop of the mayonnaise mixture.

Saturday night was our date night. We had dinner in downtown Columbia, SC at a restaurant called Basil. It's a Thai restaurant and it's super yummy!! The first time we went to Basil was a few years ago in downtown Charleston, SC with my brother and his wife and we loved it. So Luke and I were both really excited when a Basil restaurant opened in Columba last year.
I have a new favorite drink. It's a Pineapple Mojito. I don't usually like Mojitos, but the pineapple was calling my name so when I saw that on the menu, I thought I had to try it. Oh my gosh, it's so good! I told Luke he has to try to remake this drink at home! ;)
Yesterday I spent most of my afternoon in the kitchen. Luke and I had separate meals for dinner but we cooked and ate dinner together so it worked out. :) For dinner, I had Giada's lentil burger.
Giada De Laurentiis is one of my favorite Food Network chefs. I love her show and her recipes! Over the years, I've tried so many of her recipes and they've all turned out delicious. I recently bought her new cookbook, "Giada's Feel Good Food" which offers a wide variety of recipes. I've already tried several of the recipes in this cookbook and none of them have disappointed.
The Lentil Burger with Lemon-Basil mayonnaise which I had for dinner is from her cookbook. Oh my goodness, yum! However, it is time consuming so don't expect to whip this recipe together within a few minutes and eat. Once you combine everything, you have to put the "burgers" into the refrigerator for at least 30 minutes to set, but they're delicious so they're worth the wait. :)
Lentil Burger:
1/2 extra-virgin olive oil
2 large shallots or small onion, minced
1 1/2 tsp kosher salt
1/2 tsp pepper
2 garlic cloves, minced
6 mushrooms, chopped
2 tbsp. fresh thyme leaves, chopped (or 1 tbsp. dried thyme)
1/2 cup green peas
2 cans lentils, rinsed and drained (or 1/2 bag of dried lentils, rinsed, then cook for 20 minutes)
1/2 cup, plus 1/3 cup cornmeal
2 tbsp. mayonnaise
1tbsp fresh lemon juice
In a medium skillet, heat 1/4 cup of olive oil and add the shallots along with 3/4 teaspoon of salt and 1/4 teaspoon of pepper. Cook until shallots are softened. Then add the garlic, mushrooms, thyme and 3/4 teaspoon of salt and 1/4 teaspoon of pepper. Cook until mushrooms are soft and set aside.
Using a food processor, puree the peas and half of the lentils until smooth. Then spoon into a bowl and add the remaining lentils, 1/3 cup of cornmeal, mayonnaise, lemon juice and mushroom mixture. Mix together with a spoon and then form into 6 patties.
Sprinkle 1/4 cup of the cornmeal onto a cookie sheet and place the patties on top of the cornmeal. Then sprinkle the remaining 1/4 cup of cornmeal on top of the patties and refrigerate for at least 30 minutes.
Heat olive oil in a large skillet over medium high heat. Cook the patties in the skillet until golden brown on each side.
Mayonnaise topping:
1 cup mayonnaise
1/2 cup fresh basil, chopped (or 1/4 cup of the basil in a tube)
Zest of 1 lemon
In a small bowl, stir the mayonnaise, basil and lemon zest until combined.
Place the patties on top of butter lettuce. Then top each pattie with sliced tomatoes and a dollop of the mayonnaise mixture.
YUM!!! :)
Wednesday, March 19, 2014
What's for Dinner Wednesday
I love looking through cookbooks to get ideas for new recipes, but when I'm in a hurry and need a dinner or dessert idea quick, I find myself Googling recipes. I've found some of the best recipes online which is one of the many reasons I decided to start blogging about food. I'm really enjoying reading other food blogs and trying some of their recipes.
We had a delicious dinner the other night! I got the recipe from one of my favorite food blogs! We had Potato and Poblano Pepper Tacos with refried beans. We had plenty of refried beans left over so Luke decided to make another meal out of them. This is Luke's recipe but I was a good wife and proof-read his recipe so this is the corrected version! However, there wasn't much I could do with the photo he took. ;)
This recipe makes 8 servings.
Quick bean roll up:
8 Flour tortillas
2 14oz. cans of refried beans
1 10oz can rotel tomatoes or favorite salsa (Luke likes to use salsa to change the flavor)
1 1/2 cup of Pepper Jack or Monterey Jack Cheese
Prepare your beans first:
Preheat the oven to 350 degrees. Stir the refried beans and the rotel tomatoes (or salsa) together and pour into a greased 8x8 pan. Bake for 10 - 15 minutes. Remove from oven and sprinkle 1 cup of cheese over the top of the beans. Then put back in the oven for another 5 minutes.
If you don't want to take the time to bake the refried beans, you can just mix the refried beans and rotel tomatoes (or salsa) in a microwave safe bowl and warm the beam mixture in the microwave on high for a few minutes until heated through.
2nd step:
Preheat oven to 425 degrees. Place flour tortillas on a flat surface and spoon the refried bean mixture onto each tortilla. Sprinkle remaining cheese over the bean mixture and roll up each tortilla. Place the tortillas on to a greased cookie sheet, flip the tortillas over every few minutes and bake until brown (about 5 - 8 minutes).
Top with some of your favorite salsa or enchilada sauce and more cheese, if desired. If your using leftover refried beans like we did or if you decide to skip the baking step, this recipe should not take more than 15 minutes.
.jpg)
We had a delicious dinner the other night! I got the recipe from one of my favorite food blogs! We had Potato and Poblano Pepper Tacos with refried beans. We had plenty of refried beans left over so Luke decided to make another meal out of them. This is Luke's recipe but I was a good wife and proof-read his recipe so this is the corrected version! However, there wasn't much I could do with the photo he took. ;)
This recipe makes 8 servings.
Quick bean roll up:
8 Flour tortillas
2 14oz. cans of refried beans
1 10oz can rotel tomatoes or favorite salsa (Luke likes to use salsa to change the flavor)
1 1/2 cup of Pepper Jack or Monterey Jack Cheese
Prepare your beans first:
Preheat the oven to 350 degrees. Stir the refried beans and the rotel tomatoes (or salsa) together and pour into a greased 8x8 pan. Bake for 10 - 15 minutes. Remove from oven and sprinkle 1 cup of cheese over the top of the beans. Then put back in the oven for another 5 minutes.
If you don't want to take the time to bake the refried beans, you can just mix the refried beans and rotel tomatoes (or salsa) in a microwave safe bowl and warm the beam mixture in the microwave on high for a few minutes until heated through.
2nd step:
Preheat oven to 425 degrees. Place flour tortillas on a flat surface and spoon the refried bean mixture onto each tortilla. Sprinkle remaining cheese over the bean mixture and roll up each tortilla. Place the tortillas on to a greased cookie sheet, flip the tortillas over every few minutes and bake until brown (about 5 - 8 minutes).
Top with some of your favorite salsa or enchilada sauce and more cheese, if desired. If your using leftover refried beans like we did or if you decide to skip the baking step, this recipe should not take more than 15 minutes.
.jpg)
Wednesday, March 12, 2014
Cook-off...Who Won It???
So here we are, our first meat vs. non-meat cook-off for the blog! I have to say Jamie's whatever she is making has no chance to my Grilled Chicken Stuffed with Sundried Tomato, Calamata Olives and Feta Cheese recipe. I think the Grecians would actually like this combo.
I had 3 big boneless chicken breast that were thawed and then I butterflied them. It's really optional to marinade the chicken or just season the outside with you favorite Greek seasoning or favorite herbs. But I will rundown the marinade quickly:
3 tablespoons of the olive oil out of the sundried tomato jar
about 1/4 cup of finely chopped sundried tomatoes out of the same jar
1 tablespoon of Salt and Black Pepper
1/2 of a squeezed lemon
2 tablespoons of Greek seasoning or Italian Seasoning (favorite seasonings)
Marinate this a few hours or marinate over night
=======
Feta cheese stuffing mixture"
6 oz of feta cheese
2 tablespoons of sundried tomato chopped
2 tablespoons of Calamata Olives
Once the mixture is fully mixed, then pull out the chicken breast and then thin them out a little. Then spoon a couple of tablespoons of stuffing onto the chicken and roll the chicken up. I used my Char-broil infared grille and cooked for approx. 40 minutes. You can also bake, pan sear or use your regular grill of choice.


I used my Char-broil Infared Grille and cooked for approx. 40 minutes. You can also bake, pan sear or use any grill of your choice.

Thanks for the vote of confidence Luke, and by the way, you know exactly what I'm making because I eat this at least once a week. I'm not going to deny your chicken is delicious. I haven't eaten it in about 2 years but I remember how good it is. However, mine is pretty tasty too!
In place of Luke's Grecian Chicken recipe is my Sundried Tomato California Turk'y "burgers". The Grillers California Turk'y burgers are my favorite out of all of the Morning Star Farms products. These are a staple in our house. I always have at least 2 boxes of these in the freezer.
.jpg)

The sundried tomato spread and sundried tomatoes with herbs are also a staple. I've always got several jars of each in the refrigerator and in our pantry. There are so many great recipes you can make using these!
My Sundried Tomato California Turk'y "burger":
2 tbsp. sundried tomato spread
2 tbsp. sundried tomatoes with herbs
Cheese
First, you brown both sides of the frozen Turk'y "burger" in a pan with cooking spray. I spoon about 2 tablespoons of the sundried tomato spread onto one Fold It Flatout Flatbread which I use as the bun. I place the browned Turk'y burger onto one side of the flatbread, and then spoon the cheese and sundried tomatoes on top of the "burger". For the cheese, I've tried it with sharp cheddar, provolone and mozzarella cheese and I think all taste great with this.
.jpg)
Next fold the other side of the flatbread over the "burger" and brown both sides of the flatbread.

Then enjoy! :)
I had 3 big boneless chicken breast that were thawed and then I butterflied them. It's really optional to marinade the chicken or just season the outside with you favorite Greek seasoning or favorite herbs. But I will rundown the marinade quickly:
3 tablespoons of the olive oil out of the sundried tomato jar
about 1/4 cup of finely chopped sundried tomatoes out of the same jar
1 tablespoon of Salt and Black Pepper
1/2 of a squeezed lemon
2 tablespoons of Greek seasoning or Italian Seasoning (favorite seasonings)
Marinate this a few hours or marinate over night
=======
Feta cheese stuffing mixture"
6 oz of feta cheese
2 tablespoons of sundried tomato chopped
2 tablespoons of Calamata Olives
Once the mixture is fully mixed, then pull out the chicken breast and then thin them out a little. Then spoon a couple of tablespoons of stuffing onto the chicken and roll the chicken up. I used my Char-broil infared grille and cooked for approx. 40 minutes. You can also bake, pan sear or use your regular grill of choice.
I used my Char-broil Infared Grille and cooked for approx. 40 minutes. You can also bake, pan sear or use any grill of your choice.
Thanks for the vote of confidence Luke, and by the way, you know exactly what I'm making because I eat this at least once a week. I'm not going to deny your chicken is delicious. I haven't eaten it in about 2 years but I remember how good it is. However, mine is pretty tasty too!
In place of Luke's Grecian Chicken recipe is my Sundried Tomato California Turk'y "burgers". The Grillers California Turk'y burgers are my favorite out of all of the Morning Star Farms products. These are a staple in our house. I always have at least 2 boxes of these in the freezer.
The sundried tomato spread and sundried tomatoes with herbs are also a staple. I've always got several jars of each in the refrigerator and in our pantry. There are so many great recipes you can make using these!
My Sundried Tomato California Turk'y "burger":
2 tbsp. sundried tomato spread
2 tbsp. sundried tomatoes with herbs
Cheese
First, you brown both sides of the frozen Turk'y "burger" in a pan with cooking spray. I spoon about 2 tablespoons of the sundried tomato spread onto one Fold It Flatout Flatbread which I use as the bun. I place the browned Turk'y burger onto one side of the flatbread, and then spoon the cheese and sundried tomatoes on top of the "burger". For the cheese, I've tried it with sharp cheddar, provolone and mozzarella cheese and I think all taste great with this.
Next fold the other side of the flatbread over the "burger" and brown both sides of the flatbread.
Then enjoy! :)
Monday, March 10, 2014
Meaty Monday...Stuffed Clams and Stuffed Scallops
I love the fact that it's 7:20 in the evening and the sun is still out! It's such a great feeling to know there are still a couple of hours of daylight left when I get home from work! To me that's worth losing an hour of sleep.
The weather was perfect today too. It was 75 degrees when I left work this evening. I came home today and took Izzy for a walk around the neighborhood, and I didn't feel the least bit rushed to get back to the house to start dinner. I feel like I still have time left in the day to enjoy. That's such a great feeling!
Dinner tonight was super easy. Publix offers the most amazing Stuffed Clams and Stuffed Scallops. They're on sale 4 for $5 through tomorrow. So they're not only delicious but they're cheap. ;) If you like crab cakes, you'll love these and even if you don't like crab cakes, you'll love these. Luke doesn't like crab cakes very much, but he LOVES these.
You can find them in the fresh market section (the fish counter) of the store. The cooking instructions are printed on the price label.
To cook the stuffed clams and the stuffed scallops, you preheat the oven to 450 degrees. Place the stuffed clams and/or stuffed scallops on a greased cookie sheet and bake for 18 - 20 minutes. Then they're ready to serve!

The green beans:
1 lb. of fresh green beans, rinsed and trimmed
2 tbsp Extra Virgin Olive Oil
1/2 tsp salt
1/4 tsp pepper
1 garlic clove, minced
First, blanch the green beans (in a pot of water, bring the green beans to a boil, remove from heat as soon as they start to boil and use a slotted spoon to put the green beans into a bowl of ice water). Pour 2 tablespoons of extra virgin olive oil into a pan over medium heat. Then add the cooled green beans to the pan. Add the salt and pepper and toss the green beans to make sure they're all coated with the EVOO, salt and pepper. Then add the minced garlic and cook for a few more minutes.

Don't forget to run over to Publix before Wednesday to grab your stuffed clams and/or stuffed scallops!!! :)
The weather was perfect today too. It was 75 degrees when I left work this evening. I came home today and took Izzy for a walk around the neighborhood, and I didn't feel the least bit rushed to get back to the house to start dinner. I feel like I still have time left in the day to enjoy. That's such a great feeling!
Dinner tonight was super easy. Publix offers the most amazing Stuffed Clams and Stuffed Scallops. They're on sale 4 for $5 through tomorrow. So they're not only delicious but they're cheap. ;) If you like crab cakes, you'll love these and even if you don't like crab cakes, you'll love these. Luke doesn't like crab cakes very much, but he LOVES these.
You can find them in the fresh market section (the fish counter) of the store. The cooking instructions are printed on the price label.
To cook the stuffed clams and the stuffed scallops, you preheat the oven to 450 degrees. Place the stuffed clams and/or stuffed scallops on a greased cookie sheet and bake for 18 - 20 minutes. Then they're ready to serve!
The green beans:
1 lb. of fresh green beans, rinsed and trimmed
2 tbsp Extra Virgin Olive Oil
1/2 tsp salt
1/4 tsp pepper
1 garlic clove, minced
First, blanch the green beans (in a pot of water, bring the green beans to a boil, remove from heat as soon as they start to boil and use a slotted spoon to put the green beans into a bowl of ice water). Pour 2 tablespoons of extra virgin olive oil into a pan over medium heat. Then add the cooled green beans to the pan. Add the salt and pepper and toss the green beans to make sure they're all coated with the EVOO, salt and pepper. Then add the minced garlic and cook for a few more minutes.
Don't forget to run over to Publix before Wednesday to grab your stuffed clams and/or stuffed scallops!!! :)
Wednesday, March 5, 2014
What's for Dinner Wednesday
If you're anything like me, by the time Wednesday rolls around I'm so ready for the weekend, and the last thing I want to think about is what we're going to have for dinner. I just want dinner to be as simple as possible. So tonight's dinner is a crockpot/slow cooker meal.
In my opinion, crockpots/slow cookers are one of the best appliances you can have in your kitchen. Especially since most of them have timers you can set so you don't have to worry about whether or not you'll get home in time to turn it off before your food burns. Plus, crockpot/slow cooker meals are usually a one-pot meal which is great for me because I hate washing dishes!
Tonight's dinner is a recipe I recreated based on a recipe I found in one of my vegetarian cookbooks. It's an Italian Potato "Stew" and it couldn't be easier to make!

Italian Potato "Stew":
1 oz. package dried porcini mushrooms
6 medium red potatoes, washed and quartered
1 14 oz. can artichoke hearts
2 garlic cloves, minced
1/2 cup white wine
3 cups jarred marinara sauce
1 cup Kalamata olives, sliced
Extra Virgin Olive Oil
Salt and Pepper to taste
Basil
Soak the porcini mushrooms in a large bowl of water for 20 - 30 minutes or until softened. Using a slotted spoon, remove the softened mushrooms from the water.
Pour the potatoes, mushrooms, artichoke hearts, garlic, wine and marinara sauce into the crockpot/slow cooker.
Cover and cook on low for 6 - 8 hours or until the potatoes are tender. Before serving, add the Kalamata olives and the salt and pepper to taste and continue cooking for another 20 - 30 minutes.
Drizzle each serving with EVOO and chopped basil or you can use 1/4 teaspoon of Gourmet Gardens Basil Paste which is what I used instead of fresh basil.

In my opinion, crockpots/slow cookers are one of the best appliances you can have in your kitchen. Especially since most of them have timers you can set so you don't have to worry about whether or not you'll get home in time to turn it off before your food burns. Plus, crockpot/slow cooker meals are usually a one-pot meal which is great for me because I hate washing dishes!
Tonight's dinner is a recipe I recreated based on a recipe I found in one of my vegetarian cookbooks. It's an Italian Potato "Stew" and it couldn't be easier to make!
Italian Potato "Stew":
1 oz. package dried porcini mushrooms
6 medium red potatoes, washed and quartered
1 14 oz. can artichoke hearts
2 garlic cloves, minced
1/2 cup white wine
3 cups jarred marinara sauce
1 cup Kalamata olives, sliced
Extra Virgin Olive Oil
Salt and Pepper to taste
Basil
Soak the porcini mushrooms in a large bowl of water for 20 - 30 minutes or until softened. Using a slotted spoon, remove the softened mushrooms from the water.
Pour the potatoes, mushrooms, artichoke hearts, garlic, wine and marinara sauce into the crockpot/slow cooker.
Cover and cook on low for 6 - 8 hours or until the potatoes are tender. Before serving, add the Kalamata olives and the salt and pepper to taste and continue cooking for another 20 - 30 minutes.
Drizzle each serving with EVOO and chopped basil or you can use 1/4 teaspoon of Gourmet Gardens Basil Paste which is what I used instead of fresh basil.

Monday, March 3, 2014
Meaty Monday
Luke and I have decided it's time to buckle down and post on our blog on a regular basis. It's not always easy to find the time to jump on the blog to share our recipes and ideas with both of us working full time and commuting to work.
Over the weekend, we came up with a plan so we'll see how well we execute the plan. We're going to do our best to share our recipes with you Monday through Friday each week. Each day will have a dedicated title with recipes to follow. Mondays will be "Meaty Monday" or "Meatless Monday" depending on what recipe we post that particular day.
Today we wanted to share the grilled Mahi Mahi recipe we ate for dinner. Luke is always in charge of the grill so this is his recipe in his words...
Per Mahi Mahi fillet:
1 tablespoon of EVOO
Pinch of Kosher salt
Pinch of Black Pepper
Dash of Ground Rep Pepper
1 Lemon Sliced (placed on top of Fish)
First of all I like to use aluminum foil on the grill just to make sure it does not get burnt to much. So get the fish and place on aluminum foil. I put the EVOO on the Foil and make sure there is enough so the fish will not stick. At that point, sprinkle the salt, pepper and the ground red pepper on both sides of the fish. Place the lemon slices on top of the fish and then make a tent with the foil place on the grill and cook for 8-12 minutes and then it should be ready to go. If you like the char of grill on the fish do the same thing and then flip over around 6 min and then put the lemons on top.
For our side dish, we roasted about a pound of asparagus. Spray a cookie sheet with cooking spray. Trim off the woody ends of the asparagus and drop the asparagus spears onto the cookie sheet. Sprinkle about 1/2 teaspoon of salt and about 1/2 teaspoon of pepper over the asparagus spears. Bake at 375 degrees for 10 to 15 minutes.

We also ate stuffed mini bell peppers but I'll share that recipe with you later this week. :)
Over the weekend, we came up with a plan so we'll see how well we execute the plan. We're going to do our best to share our recipes with you Monday through Friday each week. Each day will have a dedicated title with recipes to follow. Mondays will be "Meaty Monday" or "Meatless Monday" depending on what recipe we post that particular day.
Today we wanted to share the grilled Mahi Mahi recipe we ate for dinner. Luke is always in charge of the grill so this is his recipe in his words...
Per Mahi Mahi fillet:
1 tablespoon of EVOO
Pinch of Kosher salt
Pinch of Black Pepper
Dash of Ground Rep Pepper
1 Lemon Sliced (placed on top of Fish)
First of all I like to use aluminum foil on the grill just to make sure it does not get burnt to much. So get the fish and place on aluminum foil. I put the EVOO on the Foil and make sure there is enough so the fish will not stick. At that point, sprinkle the salt, pepper and the ground red pepper on both sides of the fish. Place the lemon slices on top of the fish and then make a tent with the foil place on the grill and cook for 8-12 minutes and then it should be ready to go. If you like the char of grill on the fish do the same thing and then flip over around 6 min and then put the lemons on top.
For our side dish, we roasted about a pound of asparagus. Spray a cookie sheet with cooking spray. Trim off the woody ends of the asparagus and drop the asparagus spears onto the cookie sheet. Sprinkle about 1/2 teaspoon of salt and about 1/2 teaspoon of pepper over the asparagus spears. Bake at 375 degrees for 10 to 15 minutes.
We also ate stuffed mini bell peppers but I'll share that recipe with you later this week. :)
Wednesday, February 12, 2014
It's Chili Weather in SC
We've actually had a lot of snow/wintery mix in SC over the last couple of weeks. Well, it's a lot for SC at least. I'm not a cold weather person so I'm ready for this to go away! I'm so ready for Spring! It's nice to have one snow day a year but that's all I want to see. I could never live up North!

I came up with this recipe last year. It was one of SC's cold days and I had been running errands all morning. All I wanted was a bowl of soup or chili for lunch. At that time, I had only been a vegetarian for a few months so I had no idea what I would make. On my drive home, I came up with this recipe...

3 cans Great Northern Beans (rinsed and drained)
1 can diced green chiles
1 can Original Rotal tomatoes
1 medium onion (chopped)
2 garlic cloves (minced)
2 cups vegetable broth (I use jarred Vegetable Base Better Than Bouillon)
1/4 teaspoon salt
1/4 teaspoon pepper
1/4 teaspoon garlic powder
1/4 teaspoon cayenne pepper
In a large pot, heat one teaspoon extra virgin olive oil over medium heat. Add the chopped onion and garlic. While the onions and garlic are softening. I prepare the Better Than Bouillon mixture in a separate pot. If you use prepared stock, you can skip this step. For the Better Than Bouillon, boil 2 cups of water and stir in 2 teaspoons of the Better Than Bouillon. Remove from heat.
Next, add the beans, green chiles, and Rotels to the softened onions and garlic. Once combined, add the salt, pepper, garlic powder and cayenne pepper. Stir the ingredients together and add the vegetable stock. Simmer the chili on low for 30 minutes to an hour.
Tonight, I also made homemade tortilla chips. I usually make these with plan Carb-Balance tortillas but I changed it up tonight. Tonight, I used Trader Jose's Habanero Lime Flour Tortillas.
Per serving, cut a tortilla into tortilla size chips (usually makes 8 triangles/chips). Spray cooking spray on a baking sheet and add the tortillas. Then spray the top of each tortilla with cooking spray and sprinkle about 1/8 teaspoon of kosher salt over the triangles. Bake for about 10 minutes in a 350 degree oven (turning the chips over after 5 minutes). I added a little extra yumminess to the chips tonight...I sprinkled cheese over the top of the chips and put them back in the oven for 2 more minutes.

Izzy was trying to dig her tennis ball out of the snow and ice.
When it's cold like this, a bowl of chili is the best dinner to warm everyone up. For dinner tonight I made my bean chili. I came up with this recipe last year. It was one of SC's cold days and I had been running errands all morning. All I wanted was a bowl of soup or chili for lunch. At that time, I had only been a vegetarian for a few months so I had no idea what I would make. On my drive home, I came up with this recipe...
3 cans Great Northern Beans (rinsed and drained)
1 can diced green chiles
1 can Original Rotal tomatoes
1 medium onion (chopped)
2 garlic cloves (minced)
2 cups vegetable broth (I use jarred Vegetable Base Better Than Bouillon)
1/4 teaspoon salt
1/4 teaspoon pepper
1/4 teaspoon garlic powder
1/4 teaspoon cayenne pepper
In a large pot, heat one teaspoon extra virgin olive oil over medium heat. Add the chopped onion and garlic. While the onions and garlic are softening. I prepare the Better Than Bouillon mixture in a separate pot. If you use prepared stock, you can skip this step. For the Better Than Bouillon, boil 2 cups of water and stir in 2 teaspoons of the Better Than Bouillon. Remove from heat.
Next, add the beans, green chiles, and Rotels to the softened onions and garlic. Once combined, add the salt, pepper, garlic powder and cayenne pepper. Stir the ingredients together and add the vegetable stock. Simmer the chili on low for 30 minutes to an hour.
Tonight, I also made homemade tortilla chips. I usually make these with plan Carb-Balance tortillas but I changed it up tonight. Tonight, I used Trader Jose's Habanero Lime Flour Tortillas.
Per serving, cut a tortilla into tortilla size chips (usually makes 8 triangles/chips). Spray cooking spray on a baking sheet and add the tortillas. Then spray the top of each tortilla with cooking spray and sprinkle about 1/8 teaspoon of kosher salt over the triangles. Bake for about 10 minutes in a 350 degree oven (turning the chips over after 5 minutes). I added a little extra yumminess to the chips tonight...I sprinkled cheese over the top of the chips and put them back in the oven for 2 more minutes.
Thursday, February 6, 2014
Favorite Seared Scallops
Scallops are one of those foods that are so easy to cook and so easy to mess up. That's why Jamie makes me cook them. I've got a simple recipe that has a little heat.
Get some nice big scallops. Pat the scallops dry or set them out to dry. While you do this, put some Olive Oil in a non-stick pan and turn on med heat.
Once scallops are dry and the oil is heated, go ahead and salt and pepper the scallops and put your favorite seasoning on them (we prefer Everglades Heat).
At this point, put the scallops in the pan and cook the scallops. Sear both sides till nice and golden brown. I also like squeezing a lemon on the scallops for a little extra flavoring.
.JPG)
Get some nice big scallops. Pat the scallops dry or set them out to dry. While you do this, put some Olive Oil in a non-stick pan and turn on med heat.
Once scallops are dry and the oil is heated, go ahead and salt and pepper the scallops and put your favorite seasoning on them (we prefer Everglades Heat).
At this point, put the scallops in the pan and cook the scallops. Sear both sides till nice and golden brown. I also like squeezing a lemon on the scallops for a little extra flavoring.
This is our seared scallops along with cauliflower mash and sauteed balsamic green beans.
Monday, January 6, 2014
Roasted Brocolli & Cheese Soup-2 times
So I decided to make some soup because it's cold outside. I On Saturday night we were going to have some soup due to nasty cold weather. We got home from church a little too late so we decided to cook it on Sunday. This was one of the better broccoli and cheese soups I have had. Since one recipe called for a little bacon I decided that I would make a pot for myself and a pot for Jamie so that we would have leftovers for lunch. I'll call the Bacon Version BBBC soup (bacon, bourbon, broccoli, cheese soup).
Thank you to Closet Cooking in helping us warming up our cold winter days. With the bacon version I changed it up a bit but for the exact recipe here it is. http://www.closetcooking.com/2010/03/broccoli-and-cheddar-soup.html
So lets get started...
Preheat the oven at 400 degrees....
I used 1 head/bunch of Broccoli and cut them into bite size pieces and mixed with salt, pepper and extra virgin olive oil. Bake broccoli in the oven for about 15 minutes at 400 degrees. While you roast the broccoli, chop a medium onion....
You will want to sautee the onion for about 5-6 minutes... If you are using bacon, I would leave enough grease to sautee the onion. If you have some drippings in the bottom of the pan, just add some bourbon to the pan to deglaze If you are making it without the bacon, use olive oil to sautee the onion. Once almost completed with the sautee of the onion chop up a clove or two of garlic. Mince finely and drop that along with a tablespoon or more of chopped thyme in the pot. Cook for about a minute or until you smell the aroma.
Add 3 cups of chicken stock or vegetable stock to the soup. I used chicken stock with the Bacon version for mine and vegetable stock for Jamie's. Add the roasted broccoli and bring to a boil and then simmer for about 20 min. Then puree the soup (leaving a few chunks of broccoli for texture). Once pureed, add cheese (I used Sharpe Cheddar Cheese), about 2 cups or so... I like A LOT of cheese so if you want your soup thick, then just throw it in.
I then added about 6-8 oz of milk and then a tablespoon of ground mustard (which is option). I topped the Bacon version with bacon. Jamie added some crackers but a nice baguette or a piece of bread will go a long way.
For the Bacon Recipe: Get 3 or 4 pieces of Bacon and fry it up... Crumble/chop it up however you like you bacon.
The Bacon Version...

The Veggie Version...

Thank you to Closet Cooking in helping us warming up our cold winter days. With the bacon version I changed it up a bit but for the exact recipe here it is. http://www.closetcooking.com/2010/03/broccoli-and-cheddar-soup.html
So lets get started...
Preheat the oven at 400 degrees....
I used 1 head/bunch of Broccoli and cut them into bite size pieces and mixed with salt, pepper and extra virgin olive oil. Bake broccoli in the oven for about 15 minutes at 400 degrees. While you roast the broccoli, chop a medium onion....
You will want to sautee the onion for about 5-6 minutes... If you are using bacon, I would leave enough grease to sautee the onion. If you have some drippings in the bottom of the pan, just add some bourbon to the pan to deglaze If you are making it without the bacon, use olive oil to sautee the onion. Once almost completed with the sautee of the onion chop up a clove or two of garlic. Mince finely and drop that along with a tablespoon or more of chopped thyme in the pot. Cook for about a minute or until you smell the aroma.
Add 3 cups of chicken stock or vegetable stock to the soup. I used chicken stock with the Bacon version for mine and vegetable stock for Jamie's. Add the roasted broccoli and bring to a boil and then simmer for about 20 min. Then puree the soup (leaving a few chunks of broccoli for texture). Once pureed, add cheese (I used Sharpe Cheddar Cheese), about 2 cups or so... I like A LOT of cheese so if you want your soup thick, then just throw it in.
I then added about 6-8 oz of milk and then a tablespoon of ground mustard (which is option). I topped the Bacon version with bacon. Jamie added some crackers but a nice baguette or a piece of bread will go a long way.
For the Bacon Recipe: Get 3 or 4 pieces of Bacon and fry it up... Crumble/chop it up however you like you bacon.
The Bacon Version...
The Veggie Version...
Sunday, December 29, 2013
Pork Infrared Tenderloin
Well mom got me this new Charbroil infrared oil less fryer/grille and I had to test it out.

I love pork and with New Years coming and myself being responsible for the main course in our New Years day dinner I had to make a trial run. I got to give a little cred to Guy Feiri show that was on TV the other day as the recipe for the stuffed part came from him. It consist of Garlic, Rosemary, Salt/Pepper and then mixed in some Pesto. Cut the Pork open and then slathered it in the middle. Close it and then put in a baking dish big enough to hold the 5 LB Pork Tenderloin and then throw in a Cup or so of white wine and then about a cup or so of Chicken Stock. I marinated it overnight and then I flipped it over once I got up the next morning. About an hour before getting the pork ready to go on the grill I cut the pork in half. I tied it up with some butcher string I covered one half with course ground pepper and salt and on the other half I covered it with pesto.
5 garlic cloves
Rosemary (2 or 3 stalks/branches)
Salt (tablespoon)
Ground Pepper (table spoon)
Oil (Olive or Grapeseed) Enough to mix everything up
Pesto... Half of a small jar
Cup or so of white wine
Cup or so of chicken stock


This cooked for about 2 hours in the infrared (between 160/170 on the thermometer) and then came out and I let it rest for 10/15 minutes. Cut and ate and I have to say it was pretty dang good. I preferred the Pesto outside but my friend who came over seemed to be indifferent as they both had good flavors.


While Luke worked on the pork tenderloin, I was in charge of the side dishes and the dessert. I'll tell you about the dessert later this week. ;) One of the side dishes was green beans, but I decided to change the green beans up a little bit. I brought 2 pounds of fresh green beans up to a boil, then drained them and soaked them in ice water. Once cooled, I sautéed the green beans and sliced about 6 white mushrooms in extra virgin olive oil. While the green beans and mushrooms were sautéing, I whisked a Dijon concoction together. Once the green beans and mushrooms were tender, I drizzled the Dijon mixture over the green beans and mushrooms and tossed them together in the pan.
2 lbs. fresh green beans
6 white mushrooms (sliced)
3 tablespoons Dijon mustard
1 tablespoon white wine vinegar
1/2 cup extra virgin olive oil
1/2 teaspoon kosher salt
1/4 teaspoon black pepper


I love pork and with New Years coming and myself being responsible for the main course in our New Years day dinner I had to make a trial run. I got to give a little cred to Guy Feiri show that was on TV the other day as the recipe for the stuffed part came from him. It consist of Garlic, Rosemary, Salt/Pepper and then mixed in some Pesto. Cut the Pork open and then slathered it in the middle. Close it and then put in a baking dish big enough to hold the 5 LB Pork Tenderloin and then throw in a Cup or so of white wine and then about a cup or so of Chicken Stock. I marinated it overnight and then I flipped it over once I got up the next morning. About an hour before getting the pork ready to go on the grill I cut the pork in half. I tied it up with some butcher string I covered one half with course ground pepper and salt and on the other half I covered it with pesto.
5 garlic cloves
Rosemary (2 or 3 stalks/branches)
Salt (tablespoon)
Ground Pepper (table spoon)
Oil (Olive or Grapeseed) Enough to mix everything up
Pesto... Half of a small jar
Cup or so of white wine
Cup or so of chicken stock


This cooked for about 2 hours in the infrared (between 160/170 on the thermometer) and then came out and I let it rest for 10/15 minutes. Cut and ate and I have to say it was pretty dang good. I preferred the Pesto outside but my friend who came over seemed to be indifferent as they both had good flavors.


While Luke worked on the pork tenderloin, I was in charge of the side dishes and the dessert. I'll tell you about the dessert later this week. ;) One of the side dishes was green beans, but I decided to change the green beans up a little bit. I brought 2 pounds of fresh green beans up to a boil, then drained them and soaked them in ice water. Once cooled, I sautéed the green beans and sliced about 6 white mushrooms in extra virgin olive oil. While the green beans and mushrooms were sautéing, I whisked a Dijon concoction together. Once the green beans and mushrooms were tender, I drizzled the Dijon mixture over the green beans and mushrooms and tossed them together in the pan.
2 lbs. fresh green beans
6 white mushrooms (sliced)
3 tablespoons Dijon mustard
1 tablespoon white wine vinegar
1/2 cup extra virgin olive oil
1/2 teaspoon kosher salt
1/4 teaspoon black pepper

Subscribe to:
Posts (Atom)
About
Social Icons


Archive title

Followers title

Google Followers title

Show Stopper
